Tuesday, October 27, 2009

Falling temps and leaves and pears

Well, I realised I had not put up a photo of the addition with the siding all done. Note the strange color variation? We are not sure why there is a difference in the blue and green pieces. They all came off of the back of the house. We are thinking it may have been a fading thing. Which is why when people wanted to look at the house no one knew if it was green or blue. Go, figure. (note, I may have mentioned this in an earlier blog, but it is VERY strange!)
The youth in our church went to a corn maze in Walla Walla. One of those things that says fall is truly on the way. Jon thought it was tame because they had paths to follow. I thought it was rather long, myself! And another part of fall is the falling leaves. Here we have Moses who has been liberated of his hated collar and was decorated with locust leaves. As I crouched to take the picture, he decided he wanted to see what I was doing. He had been sitting there in the sun for several minutes and was looking very cute!
The most amazing part of this fall has been the plethora of pears! Our plum tree was pretty sparse this year, but the sink in the photo has just some of the pears that fell off the tree during yesterday's amazing wind storm. I don't know what to do with them all! No one but me eats pears~ And the teeny one came off of our other pear tree. It was too cute for words and I set it next to the teaspoon for a true comparison.
And last, but by no means least, is our dishwasher!!!!!!! The 25$ bargain we found on Craig's List covered by a piece of wood from Home Depot that was also a bargain (I think it was 6$ because it was broken on the far end.). Am very excited about this being up and running finally! And I have more real counter space now!!! Steve did a great job! (even if it is not quite finished exactly...)

Saturday, October 17, 2009

Chem Lab!

Well, we didn't get a single deer. Very sad. So, deer season ended last Wed. This Saturday we did a chemistry merit badge at Whitman college. It was a great deal of fun and although Jon did most of the stuff at home, he did get to do some hands on experiments. We also got to see some pretty cool demonstrations of chemistry. Unfortunately, I am not very adept with my new camera yet and many of the photos were blurry. Sad, but true. So, here is what I got today.

These are of the mento and soda pop blow ups. They used these specially made doo hickey things to drop the mentos in the soda. It worked VERY well. The last two frames are of Jon's soda pop. The worst part of this was the boys were told they could NOT drink the leftover soda as the mentos had been in the chem lab. It is very bad to eat things that are stored in the chemistry lab. That rule made the Scouts very sad.
In this first photo the guys are making mini marshmallows grow and shrink with vacuum.
Here Jon was doing something with combining chemicals, they had to record their results in pen. It appears that pen is the preferred method of recording chemistry data and it is recommended that you use ball point as some other forms of pen react badly to certain chemicals. One young chemist told us about a lab partner he had who actually lost all his data when a chemical spilled on his paper and the ink vanished! (So much for the dog eating your homework!)


These last photos are of a couple of the experiments. The goo in the tube is called elephant's toothpaste and the young lady had already moved when I turned the camera to see what the boys found so amazing! The young man in the background is Nathan, the chem lab professor. The balloon has hydrogen in it and when it was lit on fire it well..exploded. The boys were VERY impressed with that one. The last one almost didn't work. The plant container on top had thermite in it. When it was lit on fire with magnesium the stuff melted and turned into molton iron that flowed into the bottom containers. It melted the top clay planter, too!
An amazing day in the world of Science!

Friday, October 09, 2009

Still no deer, but....

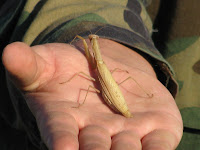
Jon caught this bug up at Grandma's...well, ok, it is a praying mantis and it was so creepy I had to use the zoom part of the camera on it. I don't mind snakes, but bugs just have too many legs. (shudder) If I am close to bugs, they better be in bug jars!


Later that day, we did see the most amazing thing ever. A young (it was a teen age kitty) cat was stalking a pheasant! We watched it for a long time, and it appeared the kit finally gave up. We really wanted to see what would happen when they met. The pheasant did look rather confused, though. It was too far away in the field for a video, so you just get the series of photos.

On Friday there was no school, so Jon and Grandpa went up in the Toyota. All day they wandered the hills in search of deer..and found nothing.

Finished Howard's End (very very very good book). Might do The Fairy Godmother by M. Lackey again..not sure.

Wednesday, October 07, 2009

Hunting season

So, far it has been just a lot of long hikes. I even went up with Jon after school one day (Monday) and it was lovely, but very cold. He wouldn't let me hike with him, though..he said he could be quieter on his own. He also is using gdpa's rifle...which is an automatic and so far he has not gotten his deer. Very sad, but kind of funny! One shot, one kill has bit the dust! Steve said he's a normal hunter now.


In the last photo there is a black dot...it is a bear. It was watching them! Except for the bird and the one of Jon, all the pictures are on or around a draw (or canyon) that they like to hunt in.

The robin is one of the hundreds of of them that are all over up at the ranch. We did see a grouse..Jon almost ran it over with the Toyota (he drove it, 3rd generation to do that!).

Saturday, October 03, 2009

It is finally fall...

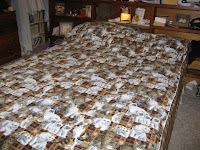
OK, I am not totally thrilled fall is here. It has been rather chilly out and last week we had to turn on the heater for the first time since well...we turned it off! I did get my blanket done in time, though. Very glad.

I learned a lot from this project. 1. Buy fabric from a fabric store. I like the patterns and the print, however...it was NOT printed on the fabric straight. 2. Just because a fabric has lines does not mean they always end up the same direction when you cut. 3. If you go back to a project after a bit of a spell...measure everything again! I had to rip out the first seam of the thing when I realised the printed material was off. I had not noticed it on the bed, but did when it was on the floor. 4. When making a blanket, use the old one for a reference. I made this one about 6 inches short on each side. 5. Serging over a serge is not as easy as it sounds. 6. And you CAN serge and sew on the same project!!! So, there you have it. Our 'new' polar fleece blanket and if mum can send me about 2 more yards of mid weight dark brown fleece, I can make it right!

It is a cool cats print and the 'edges' are of a plaid that is within the print. I backed it with my very favorite old flannel sheep sheet. (Just on the printed part)


This is a project Jon made for Biology. It is a plant cell made in 3D from wood. He cut it all out and then painted it and labeled it (I helped with that, he need more hands to glue and hold the strings tight while they dried a bit! I held the glue and the blow drier...)
Best news ever: Tony is back from Romania!!! He is in Vilseck and we'll see what happens next.
Am reading EM Forester's book Howard's End..very long and very funny and very thoughtful!

Tuesday, September 22, 2009

"Ice Cream! We're Gonna Eat Ice Cream!"


And if it was Huckleberry, it was gone! Favorite ice cream of the Round up goers was definitely the pretty purple stuff with the berries. I don't know how much was eventually sold, but overall I heard that they sold more than previous years. Of course, with cones the size most of the guys made..it is no wonder that for 3 bucks people were crowding the booth! These unidentified children were very pleased with their cone of choice! I distinctly remember one little lady when she got her cone. She took it gently and her eyes grew large as she whispered 'Wow...' Now, that was a reaction that showed appreciation.

Friday was the Round up parade. And as a picture is worth a thousand words..here are some pictures!
You can make your own captions. Also, there was NOT a WSU float this year..or at least, I didn't see one. And Sasquatch, he always hangs out with the Commissioner.

(Quote in title cribbed from Bill Cosby)

Thursday, September 17, 2009

Maximum Ride is not.

Well, just a note. Found out why the bubble gum books I mentioned below made me think bubble gum..they are not all written by the author! He does what several other author's do..he has group writes where people write for him and then he puts his name on them. Grrrrrr.

Also wanted to post a picture of the Oreos I made. Link on the right for the Cupcake Project is where the recipe came from, thanks to Stacey! (Friends are so wonderful!) These had green colored mint filling. YUM!

And Steve is just about done with the siding. Notice the odd colors we have. The greenish one is the original house color and the white ones are the new boards. We have no idea where the baby blue ones came from..but we took them all off the house that was there! It will all be up by this weekend!
And Jon has been seriously in the sky lately. I have TONS of cloud pictures on both digital cameras.

Am reading EM Forster for Noelle and FINALLY got the Empire of Ivory so I can finish that silly dragon series!

Saturday, September 12, 2009

siding and cement

Actually, that is not as odd as it sounds. The siding is a type of cement board and Steve has been putting it on the new addition. However, it is not that easy to cut nor is it easy to staple on!

And my cement leaves are VERY cool. I have also made some stones with excess cement from the leaf decor. I only have room to make a few leaves at a time and needed to do something with the extra cement!

this leaf I sprayed with cooking spray.

I have used sunflower leaves (my favorite!), rhubarb leaves (next favorite) and the pumpkin leaves. In the stepping stones I used lots of different leaves to make shapes. In the one above I think I used choke cherry leaves..but I am not sure! The rhubarb leaf above has the veins left in it because Karla B suggested letting the leaves 'rot' to make it easier to get off. And guess what?? She was right!! After a day or so, the leaf was so dry, the bits slid right out of the lines. Way to go, Karla!!!
I am not sure how that happened..in the pictures file, the stone has the butterfly shape facing us, no on its side. Hmmm, odd. Am reading James Patterson. I liked his adult book As the Wind Blows..the kid ones are rather ummmmm, kiddish! The adult ones seemed more realistic, the ones about Maximum Ride are more bubble gum and not as scary real.

Tuesday, September 01, 2009

Things I have learned from cement.

This is the rhubarb leaf that I made. As you can see the veins in rhubarb are very thick, which made it not easy for them to release from the cement. Thus, I broke some of it. Which was very sad and why the second photo has bits at the top of the leaf. I also used mortar because I wanted a smooth textured leaf. This may be why it crumbled so easily. I will try this again with regular cement. After the curing, I will attempt to fix these breaks and the large crack in the top of the leaf on the right.
When you make a cement leaf here are a few things that I learned. You place a nice pile of sand or whatever under the plastic that you place the leaf on. I have poked several leaves when making my piles and seeing if the pile is right for the leaf. Then, you cut your wire. I think that if you used that tiny holed chicken wire (not sure what it is called, but we don't have any and so I use this stuff!) it might be easier to work with! I also sprayed the pumpkin leaf with cooking oil this time. It will be interesting to see what happens! LOL.

You put a layer of cement on top of the leaf, if the cement is too dry it will not glop well. I like a really gooky type! I have also learned to NOT put the first layer of cement clear to the edge (does not always work, though). On top of that you put the screening material and then glop on more cement. This is where you go to the edge of the leaf...sometimes! Then you cover it and let rest for about 3 days. We'll see what they look like then! The long part is the curing time, which most sites suggest is 3o days!!!!!! You know, it is pretty hard to find places to stash these things! And after unwrapping the rhubarb leaf, Jon asked, "Mom, what are you going to do with it?" I replied, "Not sure, but it is pretty cool!"


And last but not least, a cat! Maxwell, reclining in an out of the way spot..keeping an eye on things.