Saturday, November 28, 2015

50's Christmas Tree!

Coming up with new ways to use old things is one of my favorite things to do. I made tree garlands from old worn out fake Christmas trees in 2012 (follow link!). I made SEVERAL different kinds of garlands and placed them all over the house. I had so much FUN! Over the years adaptation has been necessary. The garland over the blue curtain is now on a different door and the garland I made for the stairwell was taken apart (hanging that garland was always dangerous as the stairs are super steep!!) and I turned part of it into my 50's tree!

When you google dress form dummy trees, you get a zillion hits and images. I have had this lovely dress form for several years and often put her (I call her Oprah, she does dress very well!) in some of my Gunne Sax dresses. Unfortunately, she needed oiled and the dresses were too small for her. SO, Steve fixed her up. She was prime material for a project! I decided to take this dress dummy from 1915 and decorate her. She is pretty short, so I asked Steve for a box to set her on. She is now a smaller version than she used to be, although, her waist is still an inch larger than mine was in the 80's....
 I wanted to give her a 50's look. Where would we be without google??? I looked for ideas on skirts and tops and came up with a red top and button up sweater. I originally had her in a bright red sweater, but it was too big!!!!
 I added a bungee cord to hold in the fake boughs. Steve straightened out the hook parts and then ended up cutting them off to make them a little shorter. They were sticking in her rib cage area!!!
 If you use real boughs, it is a good idea to create a chicken wire 'cage' to put the branches and decor in. The odd garland from the stair, I bent down to make a fringe. This was wrapped around her middle to make a waistband.

She is beginning to look a lot like Christmas!! 
We had gotten our hands on a short string of battery operated Christmas lights. There were perfect for this project of mine! I 
 I tried the three light settings and preferred the white lights. The blinky ones were a bit much. Jon suggested we name this Christmas gal Lady MacBeth, because she was disguised as a tree. I told him it wouldn't work. She doesn't have hands and couldn't wash out that spot. I then said, the one thing we will NOT name her is Holly. Jon grinned and said, "Short?" I had no choice. Our Christmas tree is now Holly Short (see awesome books by  Eoin Colfer!). Jon also decided Holly needed a helmet. It didn't last long. We were pretty sure Foaly would have wired this Yuletide gown with a potent arsenal!
 Introducing, a lovely 50's dress made exclusively for Captain Holly Short, LEPRecon. (Lower Element Police for the uninformed!)


Monday, November 16, 2015

Krispy Brownie Fluff

This is not a recipe to make in minutes. But, it is absolutely delicious! You need a few ingredients and patience. I'll share my photos and directions below, but I also understand how irritating it is to not find the recipe til you get to the bottom of a blog. Therefore, the recipe is first. :o)
Recipe:
1 box of brownies
4 cups mini marshmallows/small jar of marshmallow cream
1 1/3 cup chocolate semi sweet chocolate chips
1 cup creamy peanut butter
3 TB margarine or butter
2 cups crispy rice cereal
Bake brownies. While still warm sprinkle on marshmallows or drizzle on cream. Place back in oven for 2 min to melt and then spread over brownie. COOL completely. 
Microwave chocolate, marg/butter, and peanut butter until smooth. Add cereal and mix to coat completely. Drop on to cooled marshmallow layer and spread to edge of pan. Cool completely before cutting. 

So, you will need your basic box of brownies made per directions on box. You can make home made brownies, but I prefer the lazier method. I bake them in a larger cake pan (9x13). (The directions I have for this recipe suggest lining the pan with parchment paper or non stick foil. I've never done this. I don't know why it is suggested, but am sure someone had a good reason.) When the brownies are done and still warm, you sprinkle 4 cups of mini marshmallows on top--or dab on blobs of Marshmallow cream. Place back in the oven for 2 minutes, or so, and spread across the brownie to make a lovely sticky white layer. This is the patience part cuz you need to let the whole thing cool completely. I sometimes will put them in the fridge to help speed things up toward the end of my patience and to make sure the marshmallow is stiff.
 After a long time, find a microwave safe bowl and put 3 TB of butter or margarine in it. Add 1 cup of creamy peanut butter, and 1 1/3 cup of chocolate chips. I used semi-sweet. Microwave and stir until the chips are melted and ingredients combined together.
 Add to this chocolate goo, 2 cups of crisp rice cereal. Most people use the plain rice krispies, my family prefers the chocolate kind. Mix completely and drop onto the confection you are creating.
 Once it is all smoothed on top of the marshmallow, no one will know you have layers of decadence waiting to be cut! But, you have to wait again. The chocolate topping needs to solidify before you dive in with a knife. I actually broke the tip of one of my best knives on the edge of one of these. So, now I cover it and let the layers meld together and soften the brownies if I've baked them too long.
 Finally, it is time to cut into these delectable brownies. Hooray! The marshmallow pulls away, reluctant to leave its chocolaty home, but you must prevail. The brownies are sooo messy and yummy. They can be served on a plate with a fork, but licking a plate is less acceptable than licking fingers. So, go for the finger/hands method. They wash.
 I did not include how many you can cut from each pan of Krispy Brownie Fluff. If you have my family, larger pieces are more efficient. Your family might be different. No matter, have fun and enjoy!

Thursday, November 05, 2015

It's a Parade!!!

Hops are one of the strangest, most fascinating plants around. You can use them in many ways (most people make beers from them) and in later fall, they are an organic (and somewhat itchy) confetti! 
 I decided, since we had such a pretty day, the things needed taken down. Usually Steve does this, but I opted to this year. (he is working on the roof instead!)
 When you tug on the sharp vines (the vines have some sort of coating that scratches) to get them out of the trees,  dried petals release from the cones and float down through the sunshine onto the ground. Lovely!

 They would make a beautiful indoor dried floral arrangement, if the petals were more firmly attached.
 The single start I got from Elgin (I think this is where I got it) grows up into my neighbor's tree almost every year. We try to aggressively trim it, to help contain the vines. But, missing a couple of weeks allows it to escape and the darn thing takes off. Hoping someone on Tex's side can get her tree free from this confetti creature.
 No parade is complete without balloons or Japanese Lanterns to line the path.
 Dancing fairy lights illuminate the world as they reflect off the tiny pond.
 Spectators oooh and ahh over the display of colors gracing the participants.
 Even the dollar plants are ready to empty their purses into the crowd!
 Everywhere you turn, it is apparent the parade is here for a long couple of weeks, rain or shine. I, for one, am very thankful.

Tuesday, November 03, 2015

Stuffing Burgers

In the name of experimental dinners and the cheeseburger devotions I am working on for a friend, I opted to try putting veggies in a cheeseburger. Jon was absolutely unimpressed, but took photos for me anyway. I used Coppock burger (4 pounds, I don't often use that much, but this was for a special occasion!) with about an eighth of a cup of Worcestershire sauce and a healthy double shake of a pepper seasoning I found in the cupboard. 

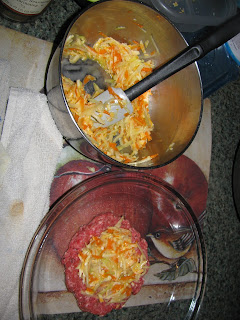
 I have made stuffed burgers before (Bacon Turtles), but not with veggies. I used one of my all time ever favorite recipes from Skinnytaste, with adaptations. For the inside part of the burger (it appears even the birds like it!!) I grated zucchini and carrot, added shredded cojack cheese, and one egg and mixed it thoroughly. I have this handy little burger making form with the name Tupperware on it. I didn't fill it to the top because I needed two, but it makes a great shape for patties!


 I put a smear of catsup on top with a couple of bits of bacon (yeah, it was already cooked, but it still worked!). Popped them in the oven (covered) at about 425 for 35 minutes. (the cheesy french fries took LONGER!)

A slice of Tillamook cheddar was added to the top later. Jon, after his earlier skepticism, was really impressed and ate TWO! The leftover stuffing I added about 1/4 of bread crumbs to and cooked that as a patty. (I much prefer those tots as patties, great to reheat for lunches!)
I realise this is not organised as to how much of the different ingredients you might need. I didn't measure anything and the only items I know were absolutely the proper amounts are the egg and the burger. However, it was yummy and not as much work as I thought it would be! If you opt to try it, have fun!!!