Saturday, May 21, 2016

Simple Snacks from a Biscuit Mix

I mentioned this one in FB. Super salty and super easy. They are called (I believe) Roll Ups or Spam Pinwheels. It is a recipe from around the 70's or so. 
  They were fairly simple to create. You need 1 can of spam, minced (next time I will use the low sodium stuff); 2 1/4 cups Bisquick (or other biscuit mix); 2/3 a cup of milk; and about 3/4 cup of shredded cheese. Combine the Bisquick and milk to make a soft dough. Roll out into a large rectangle. Spread minced spam and cheese on dough and roll long way into a jelly roll. Cut about 3/4 of an inch thick and place on parchment paper or lightly greased cookie sheet. Bake at 450 degrees for 8-10 min. (many people also place them on the sheet, seam side down-I liked them this way, too)

  Then, there was this other recipe I found. It is even easier and uses sausage. I think making it with pork sausage instead of deer might make it stickier. I'll try that next time, but I had the deer sausage thawed out already.
  The second one is known as 'Sausage Balls' and has 3 ingredients. 1 pound ground pork sausage, 2 cups of biscuit baking mix, 1 pound shredded cheese. Preheat oven to 350 degrees. Combine sausage, flour mix, and cheese in a gallon sized plastic bag. Mix thoroughly. Form into small balls and place on parchment paper. Bake for 20-25 minutes.


They would make a good bite sized appetizer. My half recipe made 24 balls about the size of my cookie scoop.

Thursday, May 19, 2016

Garden Bling!

I am amazed and humbled. This is a plant which I have had dubious relations with. It seemed to grow and bloom poorly and it narrowly missed being evicted many times. This year? It is covered with healthy leaves and dozens of buds. It must be the new trellis Steve made for it...Or maybe it appreciates having the nightshade I grew next to it gone???? 
 This, however, was my project today. I have wanted to do something with this section of the fence for quite a while. After Tex's SIL trimmed back the bushy tree, it opened up a whole new section of sunshine. It is still heavily shaded, so I wanted to do something shiny and festive. This cedar fence is full of knotholes. Empty, boring holes in the weathered wood. I had read articles about sprucing up fences with marbles. Steve was getting rid of bits of wood, one of which was a giant moon shape. I decided space was in my future!
 I also had a sort of a vase shape in the yard, aching to be planted. Unfortunately, the majority of the pieces of wood were prototypes for a gumball machine Steve made in HS. The toy and the bits were walnut, which does NOT do well with plain old staples. Thankfully, I was able to enlist Jon's help. He wasn't super impressed, but he had great ideas which worked. We put up the sort of forget-me-not flower after most of the rest of the wall was done. He thought of twisting a green Mardigras bead necklace for the stem.
 Jon also added the first gold bead section to my 'bird netting space grid'-he said they could be meteors. The pale shapes (stars) are supposed to glow in the dark. In the photograph there are two 'planets' (a red one and an orange one--they have old CD's behind them to help them shine), the moon, spaceships, and a board, which will hold a ticket to the moon (yes, ELO!). There are also bits of shiny necklace beads that had broken off from a fancy necklace, crystals from somewhere, dangling over holes too big for marbles, and assorted bling from various other places. Jon said this part was 'Art'.


 The marbles, however, caused the most heated discussion in the whole project. All the articles I looked over said to drill holes in the wood, hammer in the marbles, and there you go. I pressed several marbles in knotholes, hammering them in lightly, if needed. But, I wanted more!!!! (it is an addicting decoration!) Jon saw what I had done, liked it, and was skeptical. He insisted the marbles needed to be glued in because not all marbles were the same size and the holes would all be off. I was not going to let him do that. The glue would surround the marble and make it not see thru. I was also annoyed the holes he had drilled were not completely thru the wood. Eventually, we realised we were both right. He used the drill to make complete holes in the boards and I let him use glue. It was a perfect agreement. We did the space corner and then added more marbles to the rest of the fence.
 Amazing fun! It will look super in the morning light on Tex's side and it looked festive in the setting sun on mine! Win win situation. I may even sneak into her yard with more marbles and finish filling in knotholes from her side of the fence.

Monday, May 16, 2016

BLT--Bacon, Lettuce, Turtles!

Once again, I made these yummy treats. (Tony wanted them!) This time, we called it a seafood lunch. Tony and Jon brought home leftover fish and shrimp from the Fireman's Banquet, so they were a perfect side for the turtles. I have gotten better at making these critters. I don't weave the bacon. It is too fiddly and uses a LOT of bacon. Wrapping it is quicker and more efficient. 
I use a mixture of ground meat. I generally mix together about 2 and a half pounds of meat with  two eggs, 2/3 cup of bread crumbs, seasoning, and a  half a cup of milk. I have a favorite meat loaf recipe I use for turtles. Any left over meat makes great meat balls. I take about a 1/4 pound of meat and form it into a patty. In the center I place cheese, minced pineapple, or shredded veggies.I form another patty and place it on top, pressing down the edges to make a mound of meat. Then, I take 4 strips of thin bacon and wrap them around the burger.This means one turtle only has 3 pieces of bacon, but it is doable. (Oddly, bacon packages have 11 pieces and not 12. Crazy!) For the appendages, I use smokies. They are the perfect size for slicing into tails and heads and toes. (You need to cut 6 smokies per turtle.) Once they are all assembled, I add two cloves for eyes on the head. The smokie doesn't taste too strong after having cloves baked in it! Toothpicks are added in order to keep the turtle 'shell' from curling up during baking. 


 A weave makes for a prettier turtle. Wraps make for less work. I assembled these guys with about 10 min per turtle. NOTE: I forgot to put down foil in the bottom of the baking pan. Making for a LOT of work in clean up.
 Turtle with shrimp and salmon and on a bun with lettuce~
 Sucking the leg off a turtle! How can something so wrong be so right?????

Sunday, May 08, 2016

BMCC Cruisin' for Scholarships Car Show

 We've never been participants at one of these things. We've visited a couple here and there (not as many as I'd like!), but it is very different being on the car end. We had pre-registered and signs said to be there by 830. We drove in and there were dozens of cars already parked! We were fortunate, we ended up under a tree and right next to the bathrooms. We also were number 19...and we thought we had registered late--two weeks before the event!
 Several people stopped to look over Dad's Mercury. I had made a short bio for her, which also generated interest. It was neat to watch and talk to people as they admired the cars being shown. We were parked near fine rigs of different years and makes.


This International won an award for being best in the 4x4 division. It had fun decals on and in it! 

'Bath Rooms this way' signs.....And across from the bath room were blooming day lilies!! 
 Below was the giggle maker of the car show. The window identification read: "Ford A 1931. Out of shed and runs." It was in a shed and when the owner drove it out, it ran!
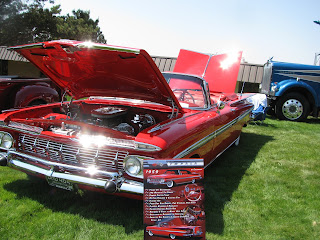
 This 1959 red Impala, won the President's Award. A gorgeous car was chromed and polished and dazzling in the sunshine! Yet....as I looked at it, I preferred the one we were parked next to.
 A blue Duster the owner found and worked on bit by bit til it was pretty and running sweet. Steve and I voted people's choice on this one, but it didn't win. It really should have.

A car show in Pendleton, OR always needs a giant tractor around. There was a beautiful Kenworth (am pretty sure it was a Kenworth) parked on the verge, as well.
 More cars!


 Due to technical difficulties with the blog, I will add the rest of the comments here!
 It was a lovely, warm day and I was able to sit in the sunshine and read quite a bit while chatting to people who stopped by to admire the Merc. The blue and white wagon was one of my favorite cars. It was comfy and the owner liked how it didn't need primping while at the show. (The owner had other cars that did need touching up once they arrived at a show. This one, however, is made for fun!)  We stopped to get pizza to bring home and I took a tired after car show selfie!

  We needed to put gas in the Mercury and found others from the show were doing the same thing! These two rigs are from the 30's. The yellow one is from Idaho and the white one from near the border between Oregon and Idaho. LONG way to cruise!


All in all, it was a fun day that culminated in having Tony home~ Oh, Happy DAY!!!