Here is Jon tearing apart one of the branches. On the floor are smallish metal rods, which are what make up each branch. Also on the floor and in the boot are what looks like curls of green doll hair (for those of you who have played with doll making). I called it elf hair and am keeping the 'clean' stuff. This is the fiber wrapped around the rod and tree bits. Jon used an Xacto to shred down the branch and removed bits very quickly.
When finished, we ended up with lots and lots of stem bits. I wasn't very pleased with the color, but I did find some greenish glitter to spruce a few up! (pun intended!)
All you need to do is take one longer bit and twist others around it. I used gloves because the trees were dusty and the wires inside were a little pokey.
As I added the bits, the garland started to take shape. I made a 4 foot garland in less than 20 minutes (the twisting/weaving part). Once I got one side as long as I wanted, I started the other side. Joining the two together in the middle made for a bulky center, but those I was able to cover up with ribbons. I think I have 7 inside garlands..so far! (only one is from real trees)
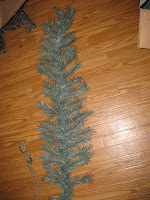
This is one half of a garland. The circle was an experiment I was trying to make a wreath, but alas..Adding bits to the circle made it look extremely odd! I'll keep working on it! However, making this circle clued me in to yet another way to make a garland. I took the 'string' of greenery and twisted the other bits around the string. Much like you do when making a real green garland, only the wire is already in the greens!
Here you can see one half done and the other part being worked on. This actually went a LOT faster than just twisting the separate parts together one by one. I will most likely do all of my others using the 'string' method.
Here we have a 'swag' made from an unaltered tree branch (ok, I did add a couple of extra green stems to cover up the metal hook that you slide into the fake trunk on the tree!). It is adorned with a bow and an ornament. I thought it turned out rather well, but Jon doesn't care for the glitter on the bow! He added the lights. Also recycled! He had seen a shotgun shell light strand elsewhere and wanted to try his hand at it. He skipped the cleaning the shells step (cuz he is a fairly neat shooter, picking up other people's brasses and shells when he finds them on the ground) and he drilled out the proper size for the lights in the base of the shell instead of just crimping the tops closed. He liked them better this way. It took him longer to find a pattern of shell colors than it did for the rest of the project! The second photo is a finished garland. I liked that if it was not balancing properly on the curtain rod, we could squeeze the wires in the greens and MAKE it secure!
This wreath is a combination of inexpensive decor, some real tree greens, and a couple of hangers. The base of this wreath is hangers duct taped together. I used green yarn to hold the branches on and then added the rest of the decor later. (the bear thing you see is a pot holder--I hang seasonal pot holders inside the door cuz they just look fun!)
I hope if you find an old tree this Christmas on the side of the road ready for disposal, you save it and make something out of it. Fake trees take an incredible amount of time to decompose and it is better to recycle and reuse!


No comments:
Post a Comment